
A kitchen backsplash is one of the highest-impact, lowest-commitment upgrades a homeowner can tackle. Whether you’re refreshing a dated kitchen or building a fresh one, backsplash tiles set the visual tone and protect your walls from splashes and spills. The good news: tile choices have exploded beyond basic white rectangles. From timeless subway patterns to bold geometric designs and natural stone textures, homeowners now have endless options to match any style and budget. This guide walks through ten trending backsplash tile ideas for 2026, plus practical installation and maintenance advice to help you choose and install the right design for your space.
Key Takeaways
- Backsplash tiles are one of the highest-impact, lowest-commitment kitchen upgrades, offering endless design options from classic subway to bold geometric patterns that protect walls while transforming your space.
- Classic subway tiles remain affordable ($3–$8 per square foot) and versatile, but experimenting with grout color, larger formats, or herringbone layouts can elevate the design beyond basic installations.
- Bold color choices and natural stone backsplash options like emerald green, marble, or slate create luxury and personality, though they require careful maintenance, sealing, and typically cost $15–$40+ per square foot.
- Budget-friendly backsplash tile solutions include light ceramic tiles, large-format designs that reduce grout lines, or peel-and-stick temporary options, which can cost as little as $2–$5 per square foot.
- Proper surface prep, thin-set mortar application, consistent grout-line spacing, and regular maintenance (sealing grout every 1–3 years and wiping spills immediately) ensure your backsplash lasts for years.
- Professional installation costs $10–$20 per square foot in labor and guarantees proper waterproofing and clean lines, making it worthwhile if DIY tiling feels outside your comfort zone.
Classic Subway Tile Backsplashes
Subway tiles, those rectangular 3″ × 6″ tiles, remain a reliable choice because they work with nearly every kitchen style. The clean, timeless aesthetic has held strong for over a century for good reason: they’re affordable, easy to replace, and instantly recognizable.
Traditional white subway tiles in a running-bond pattern (offset rows) create a simple, modern look. For a subtle twist, try light gray or soft cream subway tiles, which add warmth without abandoning the classic feel. Larger format subway tiles (4″ × 8″) work well in spacious kitchens and require fewer grout lines, which means less maintenance.
Subway tile’s real flexibility comes from grout color. Matching grout (white grout with white tile) creates seamless flow, while contrasting grout, charcoal or black, adds definition and a contemporary edge. Herringbone or chevron layouts cost more labor but elevate the design beyond basic running-bond.
Cost: $3–$8 per square foot for basic ceramic subway tiles, plus grout and labor. Installation difficulty is moderate: grout lines need steady hand work, but the tile itself is forgiving.
Mosaic and Patterned Tile Options
Mosaic backsplashes inject personality and visual interest into spaces that feel too plain. These include small glass tesserae, hand-painted ceramic pieces, or mixed-material combinations that create intricate patterns or images.
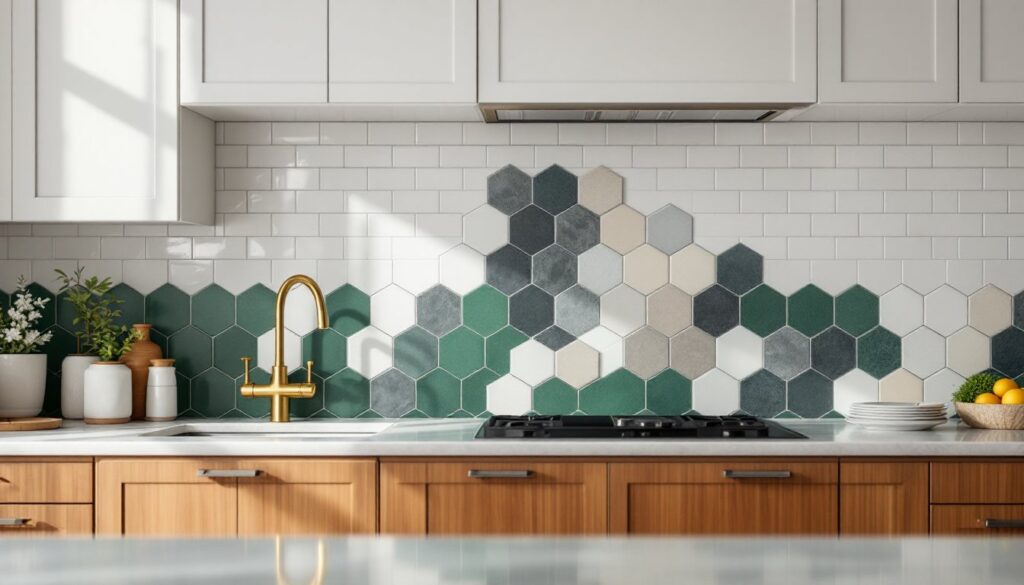
Hexagon tiles in matte or glossy finishes are hugely popular right now. They create honeycomb-like patterns and work in both neutral and bold color schemes. Zellige tiles, handcrafted Moroccan-style pieces with irregular edges, deliver artisanal character and play well with bohemian or eclectic kitchens. Their uneven surfaces require thicker adhesive and more careful spacing, but the payoff is genuine visual texture.
Patterned glass mosaics (often 1″ × 1″ or smaller) introduce shimmer and light-play. They work best in kitchens with natural light and suit contemporary or transitional styles. Pre-assembled mosaic sheets (typically 12″ × 12″) speed installation, you set whole sheets rather than individual pieces, but check that adhesive is rated for food-prep areas.
Warning: mosaic grout lines are numerous, so plan for meticulous cleaning during installation. Darker grout hides dust better than white. Cost ranges from $8–$20+ per square foot depending on materials and complexity. Difficulty: moderate to high, especially for irregular pieces.
Bold and Modern Color Choices
Backsplash is the perfect zone to introduce color without overwhelming your kitchen. Bold tiles make a statement while remaining functional and replaceable if trends shift.
Deep jewel tones, emerald green, sapphire blue, rich burgundy, pair beautifully with warm wood cabinetry and brass hardware. These colors work especially well in matte finishes, which resist glare and feel sophisticated. Terracotta and clay-toned tiles echo warm, earthy vibes and suit farmhouse, Mediterranean, or rustic aesthetics. Black or charcoal tiles create drama and anchor modern kitchens: they also hide water spots and grease splatter effectively.
Solid colored tiles offer boldness, but geometric patterns, stripes, diamonds, chevrons, deliver personality with visual complexity that keeps the eye engaged. Spanish and Portuguese ceramic tiles feature hand-painted patterns and slightly irregular sizing, which adds handmade charm. These typically cost more ($12–$25 per square foot) but last for decades.
Pro tip: order extra tiles in your chosen color, manufacturing dye lots vary slightly, and future repairs demand exact matches. Installation is straightforward once material arrives: the challenge is choosing a color you’ll live with for years, not months.
Natural Stone and Textured Tiles
Natural stone backsplashes deliver luxury and organic variation. Marble, travertine, slate, and limestone each bring distinct character, marble is elegant and light-catching, travertine is warm and rustic, slate is dramatically dark and clefted, and limestone bridges between warm and cool tones.
Stone tiles require sealing before and after grouting to prevent staining and moisture infiltration. Honed finishes (matte, slightly rough) feel more residential than polished surfaces, which can be slippery in a food-prep zone. Textured stone naturally hides water spots and wear better than smooth finishes.
Here’s the catch: natural stone is pricier ($15–$40+ per square foot) and demands expertise. Installer experience matters, improper sealing or acidic grout can etch marble or limestone. Some natural stones require professional-grade sealant and annual resealing. Slate and granite handle kitchen conditions better than marble, which is more forgiving in low-moisture applications.
Granite and slate backsplashes pair well with matching countertops, creating visual harmony. If your budget leans modest, porcelain tiles that mimic stone (often called “ceramic stone look”) offer authentic appearance at $8–$15 per square foot, with easier maintenance and no sealing needed. Installation difficulty: moderate to high for natural stone due to sealing complexities: low to moderate for porcelain alternatives.
Small Space and Budget-Friendly Solutions
Small kitchens or tight budgets don’t mean settling for boring. Smart material and layout choices stretch dollars and enhance perceived space.
Basic ceramic tiles in light colors or white remain the most affordable route ($2–$5 per square foot). Reflective glazes amplify light in compact kitchens. Running-bond layouts (standard offset rows) install faster than fancy patterns, reducing labor costs, typically the largest expense in a tile project.
Peel-and-stick adhesive tiles offer a no-permit, renter-friendly temporary option. They’re not permanent and won’t withstand heavy wear, but for 3–5 years they deliver decent aesthetics without commitment. Quality varies: read reviews carefully and ensure substrate is clean and smooth for proper adhesion.
Large-format tiles (12″ × 24″ or bigger) reduce grout line counts, meaning fewer seams to caulk, faster installation, and lower grout costs. Fewer lines also make small spaces feel larger. Downside: large tiles show imperfect walls more readily, so substrate prep is critical.
Budget hack: pair affordable standard subway tiles with bold or patterned accent strips, a single row of statement tile mixed into neutral ones creates visual impact without very costly. Install tiles yourself if comfortable with a notched trowel, level, and grout float: YouTube tutorials abound. Professional installation typically runs $10–$20 per square foot in labor.
Installation Tips and Maintenance
Backsplash installation spans from straightforward (clean substrate, apply adhesive, set tiles, grout) to tricky (uneven walls, special cuts, waterproofing requirements). Most kitchens don’t require permits, but check local codes: some jurisdictions mandate cement board or specific waterproofing behind food-prep zones.
Surface Prep: Clean grease and grime from walls with TSP (trisodium phosphate) or degreaser, then sand lightly for adhesive grip. Fill large holes or voids with joint compound. For moisture-prone areas above sinks, install cement board as underlayment, it resists mold better than drywall.
Installation: Use thin-set mortar (modified for most tiles, unmodified for natural stone) and a notched trowel matched to your tile size (typically 1/4″ for small tiles, 1/2″ for larger ones). Apply even pressure to avoid hollow spots. Spacers maintain consistent grout-line width. Backsplashes typically span counter height (15″–18″ common) or full wall to soffit, measure carefully before ordering.
Grouting and Sealing: After 24 hours curing, grout with unsanded or sanded grout (sanded for lines wider than 1/8″). Seal grout after curing (follow product instructions). Seal natural stone tiles before grout application. Caulk corners and edges where tile meets cabinet or counter, use silicone caulk, not grout, for flexibility and moisture resistance.
Maintenance: Wipe spills immediately: grout is porous. Seal grout every 1–3 years depending on product and use. Avoid acidic cleaners on marble or limestone. For routine cleaning, warm soapy water or pH-neutral tile cleaner suffices. Safety note: wear dust masks and eye protection during cutting: tile saws produce fine silica dust harmful to lungs.
Conclusion
Your backsplash choice shapes your kitchen’s character, whether you choose timeless subway tile, bold mosaic color, natural stone texture, or budget-conscious alternatives. The best design balances aesthetics with realistic maintenance and durability for your lifestyle. Start by gathering samples, viewing them in your kitchen’s light, and honestly assessing installation skill level. If tiling feels outside your comfort zone, a professional installer ensures proper waterproofing and clean lines. Whatever direction you choose, a thoughtful backsplash transforms daily kitchen work into a space you’re genuinely proud of.